How to Braise Tough Cuts: The Science Behind Slow Cooking
Braising turns the cheapest cuts into the most flavorful meals. The science of collagen, the right temperature, and the technique that gets it right every time.
The Cheapest Cuts Make the Best Braises
There is an inverse relationship in meat cookery that takes some cooks by surprise: the cheaper the cut, the better it is suited to the technique that produces the most satisfying results. Beef shin, oxtail, pork cheek, lamb shank, beef short rib — the cuts that cost the least per kilogram are exactly the cuts that reward braising most generously.
This is not coincidence. It is collagen.
Early 20th century home cooking understood this intuitively. Braised preparations from the period overwhelmingly use the working muscles of the animal — the parts that bore the animal’s weight, that moved constantly, that accumulated thick bands of connective tissue over the animal’s lifetime. Not because quality cuts were unavailable or undesirable, but because cooks of that era understood that these cuts, treated correctly, produced something that expensive muscle meat cannot: deep, complex flavor and a sauce with body.
This post explains why braising works, what is happening inside the pot at the molecular level, and how to do it correctly every time.
The Science: What Braising Actually Does
Collagen and its transformation
Connective tissue in meat is composed primarily of collagen — a structural protein that forms tight, rope-like triple helix strands binding muscle fibers together. The harder a muscle works during the animal’s life, the more collagen it accumulates. This is why a cow’s shin (which supported much of the animal’s bodyweight in constant motion) is far tougher than its tenderloin (which does almost nothing).
Raw collagen is what makes tough cuts tough. Bite into an undercooked braise and you encounter it directly: a rubbery, chewy resistance that no amount of chewing resolves. It is not the muscle fibers that are the problem — those can be made tender relatively quickly. It is the collagen surrounding them.
Heat changes collagen, but the process is slow and temperature-sensitive. Collagen starts to dissolve into gelatin in the 71–82°C (160–180°F) range, but the transformation requires extended time at these temperatures — often hours — for the collagen to fully convert.1 This is the fundamental reason braising must be done slowly: you need to hold the meat in this temperature window long enough for the conversion to run to completion.
When collagen converts to gelatin, it can absorb substantial amounts of liquid. Moisture released during cooking is absorbed into the gelatin, which is what keeps the meat moist and gives the braising liquid its characteristic body and richness.
The temperature paradox — and how braising resolves it
Here is the problem at the heart of cooking tough meat: minimizing moisture loss favors lower temperatures, but turning collagen into gelatin requires sustained temperatures above 71°C for extended time periods. Cook too hot, too fast, and you squeeze moisture out of the muscle fibers before the collagen has time to convert. The result is dry, stringy meat — overcooked in texture but still tough from connective tissue.
Braising resolves this paradox through moist heat. The liquid surrounding the meat moderates the temperature, preventing it from rising far above a gentle simmer. The covered pot creates a closed environment where steam circulates and condensation falls back into the liquid. The collagen converts slowly, releasing gelatin that enriches the braising liquid while simultaneously lubricating the now-relaxed muscle fibers. The meat becomes tender not despite the long cooking time but because of it.
The Maillard reaction — why searing matters
Before the braise begins, there is one step that a surprising number of home cooks skip: searing. The old claim that searing “seals in juices” was the traditional justification — and research has not supported it.2 What searing does produce is Maillard browning: a chemical reaction between amino acids and reducing sugars at high surface temperatures — typically between 140°C and 165°C (280–330°F) — generating hundreds of new flavor and aroma compounds that give browned meat its distinctive savory character.3
These compounds cannot form in a moist braising environment, where temperatures at the surface of the meat never exceed 100°C (the boiling point of water).
A braise built on well-seared meat will taste significantly more complex and developed than one where the meat went into the pot pale. The ten minutes this step requires is among the most valuable ten minutes in the recipe.
The Right Cuts for Braising
Not every cut benefits from braising. The technique is specifically suited to meat that is high in collagen — connective tissue that needs time and moist heat to convert. Lean, tender cuts (tenderloin, loin, chicken breast) have little collagen and will simply dry out and fall apart if braised.
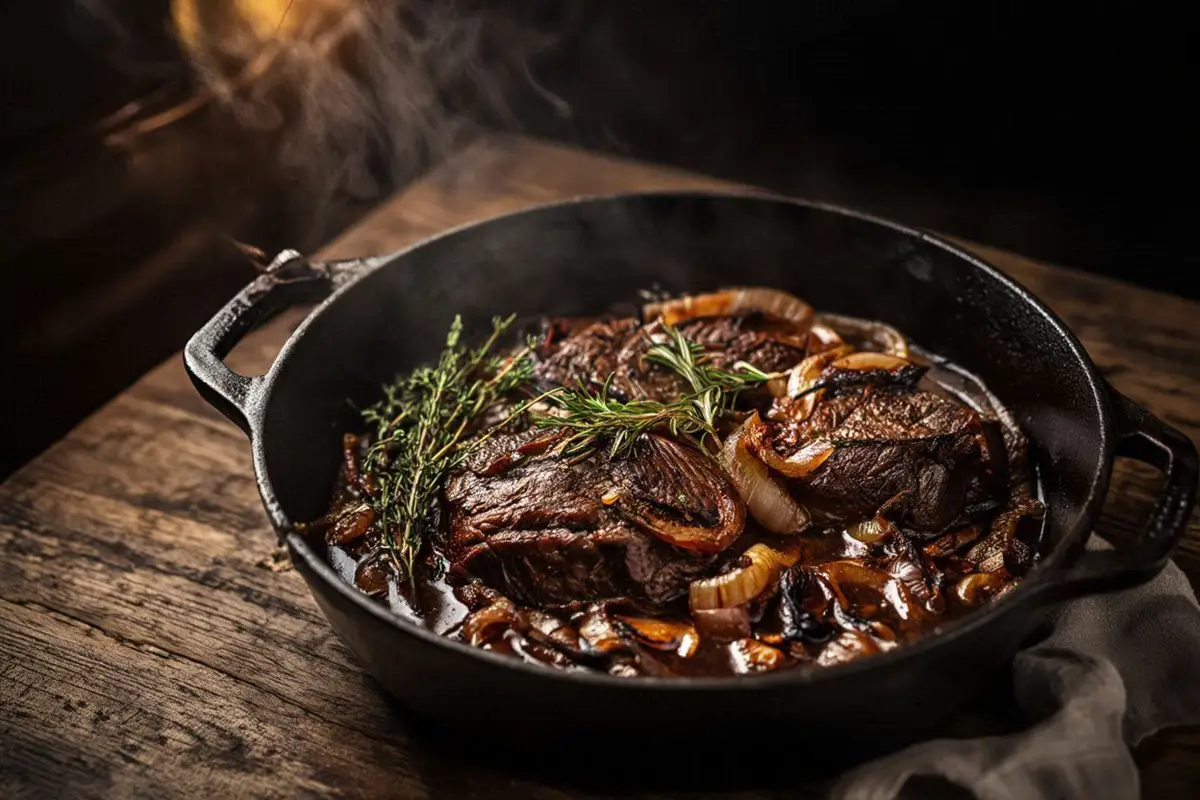
Beef: Shin (the same cut used for osso buco when cut from beef rather than veal), cheek, oxtail, short rib, brisket, chuck, neck. These are the cuts that feature most prominently in traditional Central European braised preparations — the most available, least expensive, and most rewarding to cook slowly.
Pork: Shoulder, cheek, trotters, belly, ribs. Pork shoulder is one of the most forgiving cuts to braise: substantial collagen content, good fat marbling, and a relatively quick conversion time compared to beef.
Lamb: Shank, shoulder, neck, breast. Lamb shank is among the most elegant braising cuts available — the bone contributes gelatin directly to the braising liquid, and the meat falls cleanly from the bone when done correctly.
Veal: Shin (osso buco), cheek, breast. Veal collagen converts faster than beef collagen due to the animal’s younger age; veal preparations are generally done in 1.5–2.5 hours where the equivalent beef cut would take 3–4.
Poultry: Thighs and legs only. Breast meat has too little collagen and fat to benefit from braising.
Equipment
Braising recipes from the early 20th century consistently specify a heavy covered pot. Cast iron, whether bare or enameled, is the ideal material for three reasons: it distributes heat evenly without hot spots, retains heat well enough to maintain a steady temperature at low oven settings, and its thermal mass moderates sudden temperature changes that can cause sauces to boil when they should simmer.
A tight-fitting lid is essential. The closed environment is not incidental to braising — it is the mechanism. Steam circulates, condenses on the lid, and falls back into the liquid, maintaining moisture and moderating temperature.
If a cast iron pot is unavailable, a heavy stainless steel or ceramic casserole with a tight lid will work. Thin pots with poorly fitting lids will produce braises that are drier and less consistent.
Technique — Step by Step
Step 1: Prepare the meat
Remove the meat from the refrigerator 30–45 minutes before cooking. Cold meat placed directly in a hot pan will cause the pan temperature to drop sharply, resulting in steaming rather than searing. Pat the meat very thoroughly dry with kitchen paper — surface moisture is the enemy of Maillard browning. Season generously with salt immediately before searing.
For large cuts (whole shin, brisket, shoulder), tie with kitchen twine if necessary to maintain a compact shape during the long cook. Irregular shapes cook unevenly.
Step 2: Sear properly
Heat the braising pot over high heat until genuinely hot — a drop of water should evaporate instantly on contact with the surface. Add a small amount of fat: rendered lard, beef tallow, or a neutral high-smoke-point oil. The fat should shimmer and just begin to smoke before the meat goes in.
Place the meat in the pot without crowding. If braising multiple pieces, sear in batches — crowding drops the pan temperature immediately and the meat steams grey rather than browning. Do not move the meat until it releases naturally from the pan surface; this takes 3–5 minutes per side for a large cut. Sear all surfaces, including the ends, until a deep mahogany crust has formed throughout.
Remove the seared meat and set aside. Reduce the heat to medium.
Step 3: Build the aromatic base
In the same pot, with the fat left from searing and the fond (the browned bits adhered to the pan surface — concentrated flavor that should not be discarded), cook the aromatic vegetables until softened and beginning to color. The standard Central European braising base is onion, carrot, and celery, but many period preparations use leek instead of celery, parsnip added for sweetness, or garlic added more liberally.
Cook the aromatics slowly, 10–15 minutes, until they have given up their moisture and begun to caramelize. This step builds the flavor foundation of the braising liquid.
Step 4: Deglaze and build the liquid
Add wine, stock, or a combination, and scrape the bottom of the pot with a wooden spoon to dissolve all the fond into the liquid. This incorporates into the sauce all the Maillard compounds developed during searing — do not skip it or rush it.
The braising liquid should come roughly halfway up the side of the meat — not covering it. The top half will cook in the steam. If fully submerged, you are stewing, not braising; the result is edible but the flavor concentration will be lower and the sauce thinner.
On liquid composition: Water works, but stock gives better body. Wine — red for beef and lamb, white for pork, veal, and poultry — adds acidity that balances the richness of the collagen-rich meat and contributes aromatic complexity. If wine is unavailable or undesirable, a splash of wine vinegar or a halved tomato achieves a similar acidic counterpoint.
Add herbs: bay leaf, thyme, and parsley stalks are the classic combination, along with peppercorns added whole. A small amount of anchovy paste (half a teaspoon, dissolved into the liquid) appears in some richer beef preparations — it adds umami depth without any perceptible fish flavor in the finished dish.
Step 5: Braise
Return the seared meat to the pot. Bring the liquid to a gentle simmer on the hob, then cover and transfer to an oven preheated to 150–160°C (300–325°F).
The oven environment is preferable to the hob for long braises because oven heat surrounds the pot evenly on all sides, reducing the risk of scorching at the bottom and maintaining a more consistent temperature than a hob burner. The lid should seal tightly; if your lid does not fit well, press a sheet of foil over the pot before placing the lid on top.
Check after the first hour: the liquid should be at a very gentle simmer — occasional small bubbles, not a rolling boil. If boiling vigorously, reduce oven temperature by 10°C. If completely still, increase slightly.
Timing by cut:
Beef shin, cheek, oxtail: 3–4 hours. Short rib, brisket: 2.5–3.5 hours. Chuck: 2.5–3 hours. Pork shoulder: 2–3 hours. Lamb shank: 1.5–2.5 hours. Veal shin: 1.5–2 hours. Chicken thighs: 45–75 minutes.
These are ranges, not exact times. Begin testing with a fork or skewer at the lower end of the range. The meat is done when a skewer meets no resistance at the thickest point and the meat pulls apart easily but still holds its shape. If it resists, it needs more time. Do not rush the last hour.
Step 6: Rest and finish the sauce
Remove the meat from the pot and set aside, loosely tented with foil, to rest for 15–20 minutes. During this time, finish the sauce.
Strain the braising liquid through a fine sieve, pressing the softened vegetables to extract all their liquid. Discard the solids. Skim visible fat from the surface — a fat separator or careful spooning works; if time allows, refrigerating overnight and lifting the solidified fat the next day gives the cleanest result.
Return the strained liquid to the hob and reduce over medium-high heat until it reaches the consistency of a thin sauce — it will coat the back of a spoon lightly. Taste and adjust seasoning. A small knob of cold butter whisked in at the end (mounting the sauce) adds gloss and rounds the flavor; this is a classic technique that appears consistently in period recipes as an instruction to finish sauces with fat.
What Period Recipes Get Right
Reading through early 20th century Central European braised preparations, several consistent principles stand out that align precisely with what food science now explains:
Low heat is always specified. The language varies — “a gentle heat,” “do not allow to boil,” “over the smallest flame” — but the instruction is the same. The cooks who wrote these recipes did not know about collagen conversion temperatures. They knew from experience that vigorously boiled braises produced tough, dry meat and thin, grey sauces.
Long time is always specified. Three hours is the minimum for any substantial beef preparation. Several period recipes note that older animals need four to five hours. This is not caution — it is calibrated experience. Older working animals have more cross-linked, harder-to-convert collagen than young ones.
Searing is always specified. The instruction is usually brief — “brown well in fat on all sides” — but it is never omitted. The flavor benefit of Maillard browning was understood long before the chemistry was described.
The liquid is never large in volume. These are braises, not stews. The economy of liquid concentrates the sauce and keeps the flavors from being diluted.
Practical Takeaways
The cuts best suited to braising are also the cuts most readily available at the lowest prices from any butcher. Beef shin, oxtail, and pork shoulder can often be had for a fraction of the cost of premium muscle cuts, and will, treated correctly, produce a meal more satisfying than anything a tenderloin can deliver.
This is the underlying logic of early 20th century braising — and it is no less true today. The technique costs time, not money. The investment is attention: a proper sear, patience during the long cook, care in finishing the sauce. The return on that investment is a pot of something that tastes as though it required considerably more than it did.
Braising is one of the oldest and most well-established cooking methods in European cuisine. The technique described here reflects both traditional practice and current food science understanding of heat transfer, collagen chemistry, and Maillard browning. Nothing in this post constitutes medical or nutritional advice.
Attic Recipes — digitizing and adapting Central European home cooking from the early twentieth century.
Sources
Footnotes
-
McGee, H. (2004). On Food and Cooking: The Science and Lore of the Kitchen, revised ed. Scribner, New York. ↩
-
Kim, Y.H.B. et al. (2019). Effects of searing cooking on sensory and physicochemical properties of beef steak. Korean Journal for Food Science of Animal Resources, 39(6), 921–929. https://pmc.ncbi.nlm.nih.gov/articles/PMC6957442/ ↩
-
Hodge, J.E. (1953). Dehydrated foods: Chemistry of browning reactions in model systems. Journal of Agricultural and Food Chemistry, 1(15), 928–943. https://doi.org/10.1021/jf60015a004 ↩
Frequently Asked Questions
01What is the difference between braising and stewing?▶
The key difference is the amount of liquid. In braising, meat is partially submerged — liquid comes roughly halfway up the side of the cut, and the top cooks in circulating steam. In stewing, meat is fully submerged. Braising is typically used for larger intact cuts; stewing for smaller, cubed pieces.
02What temperature should braising liquid be?▶
The braising liquid should maintain a very gentle simmer — small bubbles breaking the surface occasionally, never a rolling boil. In oven temperature terms, this corresponds to roughly 150–165°C (300–325°F) for most domestic ovens, though the actual liquid temperature inside a covered pot will be somewhat lower. A vigorous boil toughens protein fibers and produces a cloudier, less flavorful sauce.
03Does searing meat before braising make a difference?▶
Yes — for flavor, not for moisture retention. The old claim that searing seals in juices has not held up to scrutiny. What searing does produce is Maillard browning, a chemical reaction between amino acids and reducing sugars at high surface temperatures that generates hundreds of new flavor compounds. A braise made with well-seared meat will taste significantly more complex than one made without.
04How long does braising take?▶
It depends on the cut and its collagen content. As a general guide: beef cheek, oxtail, and shin need 3–4 hours; short ribs and brisket 2.5–3.5 hours; pork shoulder 2–3 hours; lamb shank 1.5–2.5 hours; chicken thighs 45–75 minutes. The reliable test is texture — a skewer should meet no resistance at the thickest point.
05Can I braise in a slow cooker instead of an oven?▶
Yes, with adjustments. A slow cooker set to low (approximately 85–90°C) will braise effectively, but the liquid does not reduce during cooking, so the finished sauce will be thinner. Use less liquid than you would in an oven and reduce the cooking liquid separately on the hob once the braise is done. Sear the meat in a pan first, as the slow cooker will not produce browning.